Goddess Statues: Difference between revisions
No edit summary Tag: Manual revert |
No edit summary |
||
| (31 intermediate revisions by the same user not shown) | |||
| Line 6: | Line 6: | ||
|content= | |content= | ||
Goddess statues can be discovered all about Quill. Once discovered its central symbol lights up and becomes usable for both fast travel and for making weekly offerings | Goddess statues can be discovered all about Quill. Once discovered its central symbol lights up and becomes usable for both fast travel and for making weekly offerings. Each week on Day 7 and 14, a random pair of Goddesses are chosen. | ||
There are 6 Fae Goddesses... | |||
{{ImageBox|image= | [[Druida]] Goddess of Orchards | ||
[[Freyl]] Goddess of Fields | |||
[[Naida]] Goddess of Fertility | |||
[[Morwenna]] Goddess of Beasts | |||
[[Aurore]] Goddess of the Sky | |||
[[Hyalis]] Goddess of Death & Rebirth | |||
{{ImageBox|image=Goddess1.png}} | |||
Interacting with the statues brings up two options | Interacting with the statues brings up two options | ||
Fast travel between discovered statues | Fast travel between discovered statues | ||
Make an offering or view your currently active [[Blessings and Curses]] | |||
Make an offering or view your currently active | |||
}} | }} | ||
| Line 25: | Line 37: | ||
|title=Fast Travel | |title=Fast Travel | ||
|content= | |content= | ||
{{ImageBox|image= | {{ImageBox|image=GoddessMap.png}} | ||
Opening the fast travel option brings you to the [[World Map|world map]]. From here you can select a new location to travel to for the cost of 1 | Opening the fast travel option brings you to the [[World Map|world map]]. From here you can select a new location to travel to for the cost of 1 Apple. | ||
[[Locations]] where the player has discovered a usable Goddess Statue have their text highlighted in white. Selecting one of these options would allow you to instantly travel to the new location. | |||
Locations that have been visited but have no | |||
Locations that have been visited but have no usable goddess statue have grey text. You will not be able to fast travel to these locations via Goddess Statues. Other methods are available. | |||
}} | }} | ||
| Line 40: | Line 51: | ||
|title=Offerings | |title=Offerings | ||
|content= | |content= | ||
On [[Goddess Day]] (7 & 14) the eyes on the statue will light up and the mouth will open. This indicates that the statue is ready for an offering. | |||
When opening the offering menu you must select which one of the pairs of Goddesses to offer an item to. | |||
The pairings are randomised each week. | |||
{{ImageBox|image=Worship1.png}} | |||
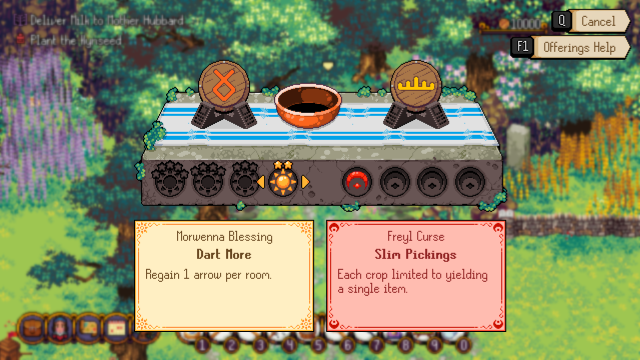
Once a selection has been made you can cycle horizontally through the available Blessings. The left set of symbols corresponds to one of the Goddesses and the right set corresponds to the other goddess in the pair. | |||
Moving the selection to the left lights up the [[Blessings and Curses|Blessing]] for the left Goddess. At the same time, the right Goddess mirrors the selection by displaying its Curse. | |||
The start rating above each symbol indicates the strength of the Blessing/Curse and the quality of the item that must be offered to unlock it. | |||
{{ImageBox|image= | {{ImageBox|image=Worship2.png}} | ||
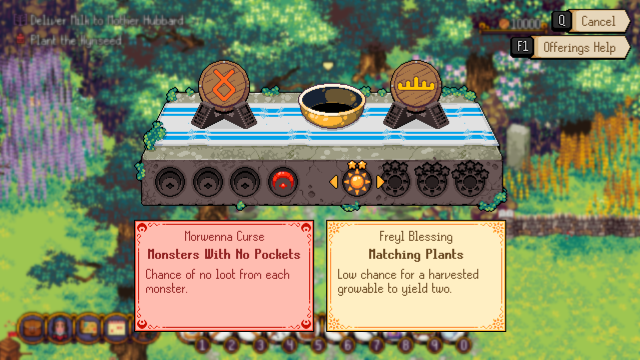
It's not possible to please both Goddesses at the same time, you must pick one over the other and suffer the curse alongside the Blessing. | |||
Moving the selection to the right reverses the [[Blessings and Curses]]. You are now making a favourable offering to the opposite Goddess on the right-hand side, whilst simultaneously angering the left. | |||
{{ImageBox|image=Worship3.png}} | |||
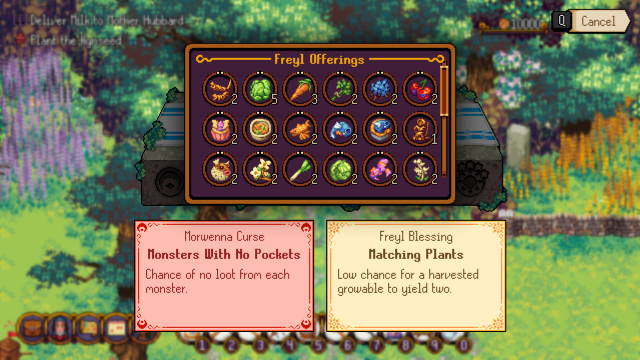
Once a Blessing is selected you'll be taken to a filtered version of your inventory, displaying only the items that the current Goddess finds appealing at the quality that's necessary for the chosen Blessing. | |||
If you don't have any items that fit this criteria, then you won't be able to make an offering at that spot. | |||
Once you have made an offering the item appears in the bowl and the symbols light up. The Blessing and Curse are shown and play resumes. | |||
The statue's chest will now light up to indicate that an offering has been made this week. The effects of these [[Blessings and Curses]] will last all week, until the next Goddess Day, when everything is reset and you can make new offerings. | |||
You don't have to make an offering at all if you don't wish to. | |||
}} | |||
{{ | {{PageSection | ||
|title=Statue Locations | |||
|content= Goddess Statues can be found in the following regions... | |||
<table class='styled-table'> | |||
<tr><th colspan='4'>Goddess Statue Locations</th></tr> | |||
<tr> | |||
<td><img src="https://wiki.kynseed.com/resources/assets/icons/locations/15.png"> [[Druidas Cross]]</td> | |||
<td><img src="https://wiki.kynseed.com/resources/assets/icons/locations/2.png"> [[Candlewych Village]]</td> | |||
<td><img src="https://wiki.kynseed.com/resources/assets/icons/locations/9.png"> [[Burial Grounds]]</td> | |||
<td><img src="https://wiki.kynseed.com/resources/assets/icons/locations/13.png"> [[Candlewych West]]</td> | |||
</tr> | |||
<tr> | |||
<td><img src="https://wiki.kynseed.com/resources/assets/icons/locations/3.png"> [[Cuckoo Wood]]</td> | |||
<td><img src="https://wiki.kynseed.com/resources/assets/icons/locations/16.png"> [[North Gate]]</td> | |||
<td><img src="https://wiki.kynseed.com/resources/assets/icons/locations/6.png"> [[Crumblechalk Mine]]</td> | |||
<td><img src="https://wiki.kynseed.com/resources/assets/icons/locations/14.png"> [[Festival Green]]</td> | |||
</tr> | |||
<tr> | |||
<td><img src="https://wiki.kynseed.com/resources/assets/icons/locations/1.png"> [[Candlewych Cottage]]</td> | |||
<td><img src="https://wiki.kynseed.com/resources/assets/icons/locations/28.png"> [[Cunning Plots]]</td> | |||
<td><img src="https://wiki.kynseed.com/resources/assets/icons/locations/27.png"> [[Mellowbrook]]</td> | |||
<td><img src="https://wiki.kynseed.com/resources/assets/icons/locations/19.png"> [[Rivermoor]]</td> | |||
</tr> | |||
<tr> | |||
<td><img src="https://wiki.kynseed.com/resources/assets/icons/locations/61.png"> [[The Twanging Gardens]]</td> | |||
<td><img src="https://wiki.kynseed.com/resources/assets/icons/locations/30.png"> [[FineFayre]]</td> | |||
<td><img src="https://wiki.kynseed.com/resources/assets/icons/locations/31.png"> [[Freyl's Fields]]</td> | |||
<td><img src="https://wiki.kynseed.com/resources/assets/icons/locations/20.png"> [[Homesteads]]</td> | |||
</tr> | |||
<tr> | |||
<td><img src="https://wiki.kynseed.com/resources/assets/icons/locations/21.png"> [[Poppyhill]]</td> | |||
<td><img src="https://wiki.kynseed.com/resources/assets/icons/locations/62.png"> [[The Shoe]]</td> | |||
<td><img src="https://wiki.kynseed.com/resources/assets/icons/locations/23.png"> [[Loverwood]]</td> | |||
<td><img src="https://wiki.kynseed.com/resources/assets/icons/locations/24.png"> [[Naida's Glory]]</td> | |||
</tr> | |||
<tr> | |||
<td><img src="https://wiki.kynseed.com/resources/assets/icons/locations/23.png"> [[FestField]]</td> | |||
<td><img src="https://wiki.kynseed.com/resources/assets/icons/locations/29.png"> [[Outlane]]</td> | |||
<td><img src="https://wiki.kynseed.com/resources/assets/icons/locations/26.png"> [[The Shingles]]</td> | |||
<td><img src="https://wiki.kynseed.com/resources/assets/icons/locations/46.png"> [[The Circle]]</td> | |||
</tr> | |||
<tr> | |||
<td><img src="https://wiki.kynseed.com/resources/assets/icons/locations/44.png"> [[Frogmarsh]]</td> | |||
<td><img src="https://wiki.kynseed.com/resources/assets/icons/locations/42.png"> [[Copperpot]]</td> | |||
<td><img src="https://wiki.kynseed.com/resources/assets/icons/locations/45.png"> [[Greymarket]]</td> | |||
<td><img src="https://wiki.kynseed.com/resources/assets/icons/locations/32.png"> [[Stonecrown]]</td> | |||
</tr> | |||
</table> | |||
}} | |||
{{PageSection | |||
|title=Broken Statues | |||
|content= There are a few broken Goddess Statues around Quill that need repairing via [[Friends & Family Builds]] before you can use them. | |||
These are located in [[Rivermoor]], [[The Circle]], [[Stonecrown]], [[The Shingles]] and [[The Twanging Gardens]]. | |||
Check their requirements as some need [[Monsters|monster]] parts. | |||
}} | |||
[[Category:Guides]] | |||
Latest revision as of 09:51, 7 March 2024
Summary
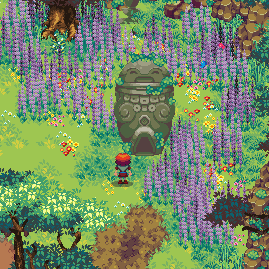
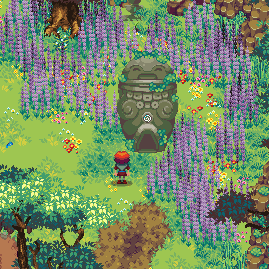
Goddess statues can be discovered all about Quill. Once discovered its central symbol lights up and becomes usable for both fast travel and for making weekly offerings. Each week on Day 7 and 14, a random pair of Goddesses are chosen.
There are 6 Fae Goddesses...
Druida Goddess of Orchards
Freyl Goddess of Fields
Naida Goddess of Fertility
Morwenna Goddess of Beasts
Aurore Goddess of the Sky
Hyalis Goddess of Death & Rebirth
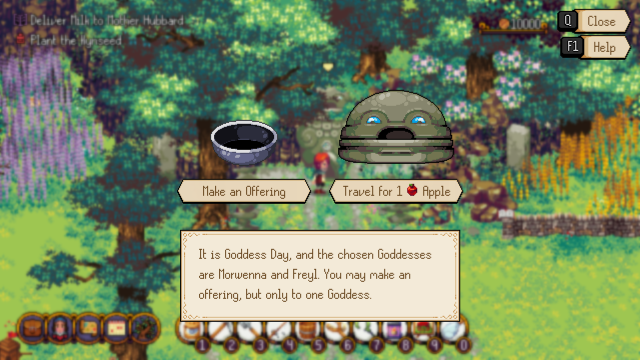
Interacting with the statues brings up two options
Fast travel between discovered statues
Make an offering or view your currently active Blessings and Curses
Fast Travel
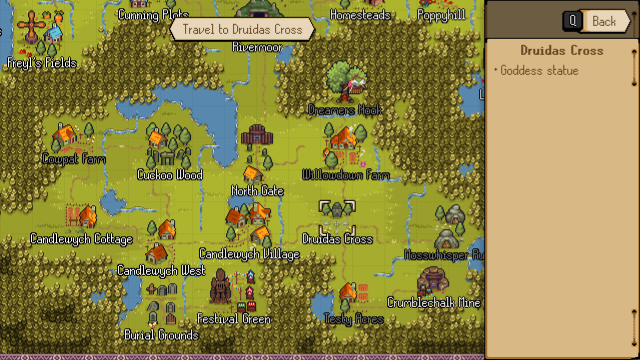
Opening the fast travel option brings you to the world map. From here you can select a new location to travel to for the cost of 1 Apple.
Locations where the player has discovered a usable Goddess Statue have their text highlighted in white. Selecting one of these options would allow you to instantly travel to the new location.
Locations that have been visited but have no usable goddess statue have grey text. You will not be able to fast travel to these locations via Goddess Statues. Other methods are available.
Offerings
On Goddess Day (7 & 14) the eyes on the statue will light up and the mouth will open. This indicates that the statue is ready for an offering.
When opening the offering menu you must select which one of the pairs of Goddesses to offer an item to. The pairings are randomised each week.
Once a selection has been made you can cycle horizontally through the available Blessings. The left set of symbols corresponds to one of the Goddesses and the right set corresponds to the other goddess in the pair.
Moving the selection to the left lights up the Blessing for the left Goddess. At the same time, the right Goddess mirrors the selection by displaying its Curse. The start rating above each symbol indicates the strength of the Blessing/Curse and the quality of the item that must be offered to unlock it.
It's not possible to please both Goddesses at the same time, you must pick one over the other and suffer the curse alongside the Blessing.
Moving the selection to the right reverses the Blessings and Curses. You are now making a favourable offering to the opposite Goddess on the right-hand side, whilst simultaneously angering the left.
Once a Blessing is selected you'll be taken to a filtered version of your inventory, displaying only the items that the current Goddess finds appealing at the quality that's necessary for the chosen Blessing.
If you don't have any items that fit this criteria, then you won't be able to make an offering at that spot.
Once you have made an offering the item appears in the bowl and the symbols light up. The Blessing and Curse are shown and play resumes.
The statue's chest will now light up to indicate that an offering has been made this week. The effects of these Blessings and Curses will last all week, until the next Goddess Day, when everything is reset and you can make new offerings.
You don't have to make an offering at all if you don't wish to.
Statue Locations
Goddess Statues can be found in the following regions...
Broken Statues
There are a few broken Goddess Statues around Quill that need repairing via Friends & Family Builds before you can use them. These are located in Rivermoor, The Circle, Stonecrown, The Shingles and The Twanging Gardens. Check their requirements as some need monster parts.
