Cooking
Intro to cooking
Recipe book
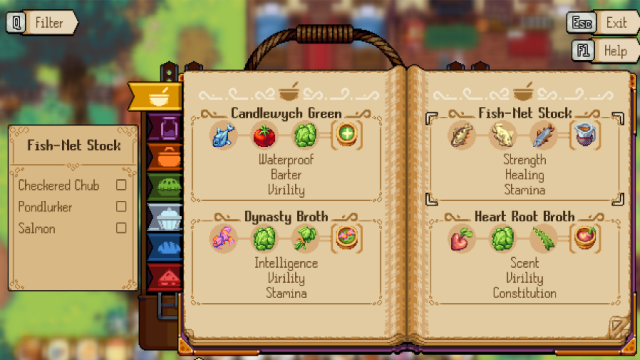
The coloured tabs at the side of the book represent the different kinds of food that you can make: Soups, jams, stews, pies, puddings, bread and sandwiches. Use them to find particular recipes more quickly. Recipes are added to the book as you discover them.
Each recipe shows the three or five ingredients required to make it, and will be greyed out if you don’t have them all in your inventory.
Cooked foods have traits that can affect the person eating them. At first these are shown with ‘???’ but will be revealed once you have made the recipe.
You can use the Filter by Trait button to show only recipes with a particular trait. This can be useful if you are planning on going on a date, into combat, or for many other things.
Soups
Inventory Selection - after clicking the soups tag and selecting a recipe
Select one of each item shown in the shopping list on the left of the screen. Your selection will be ticked off the list and added to the food tray. It can be removed by clicking it again.
Higher quality ingredients (those with the most stars) will improve the quality of your soup, but they are more delicate and therefore more difficult to cook to perfection. Choose wisely!
Once you’re happy with the selection in the tray, click the soup bowl button at its base to start cooking.
Grinding
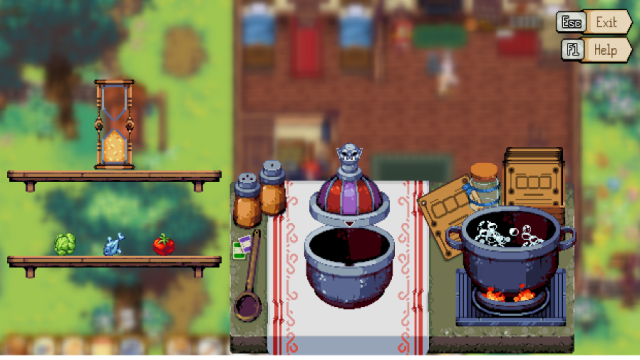
Try to blend each ingredient and add it to the pot before time runs out.
Select an ingredient from the shelf on the left to put it into the grinder. It doesn’t matter which one you choose first.
Press the Hob’s head to start the grinder rotating. Press again to stop once the arrows line up. If you miss, the grinder will shake and will rotate more slowly. You have three chances per ingredient.
Once the ingredient is ground it is added to the pot. The cooking timer flips over and starts running. Grind the other two ingredients before all the sand runs to the bottom of the timer.
Pies
Inventory Selection
Select one of each item shown in the shopping list on the left of the screen. Your selection will be ticked off the list and added to the food tray. It can be removed by clicking it again.
Higher quality ingredients (those with the most stars) will improve the quality of your pie, but they are more delicate and therefore more difficult to cook to perfection. Choose wisely!
Some ingredients like eggs and flour don’t have quality variations, so just chuck ‘em in.
Once you’re happy with the selection in the tray, click the pie button at its base to start baking.
At this point, the eggs and flour will magically combine to make dough for the pie lining and lid.
Chopping
The ingredients are on a shelf on the left of the screen. Select and click one to move it to the Chopping Board. The order in which you select them doesn’t matter.
The best knife for the job will appear. Use it to chop the ingredient - finding the right rhythm can help you chop more efficiently. Once you’ve sliced sufficiently the Chopping Board will tip up and allow you to scrape the ingredient into the Pie Dish. Repeat this until all ingredients are added.
Pastry Rolling
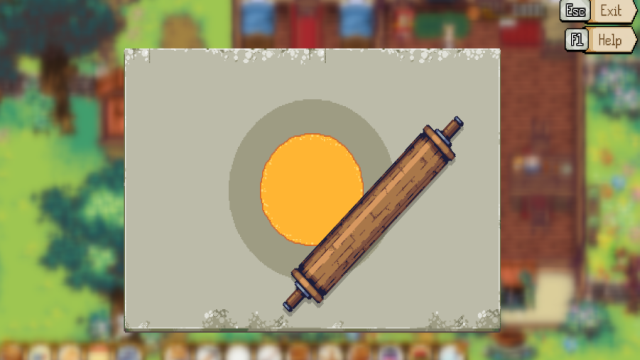
Keep changing the angle of the rolling pin and pushing it along to make the dough cover the darker target circle. Try not to overshoot too much and waste your pastry, or you may not have enough to completely cover your pie!
Once you’ve finished rolling out, the pastry is automatically trimmed and used to top your pie.
Baking
Use the paddle to slide your pie into the oven to begin baking it.
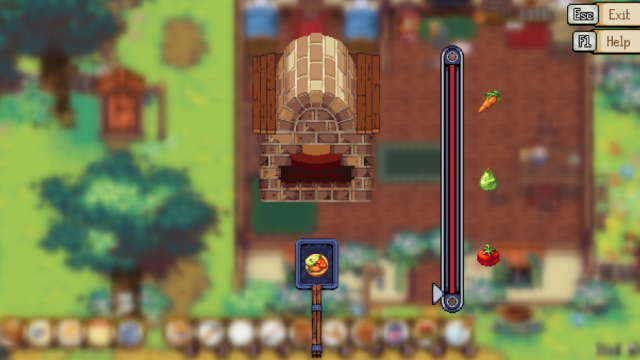
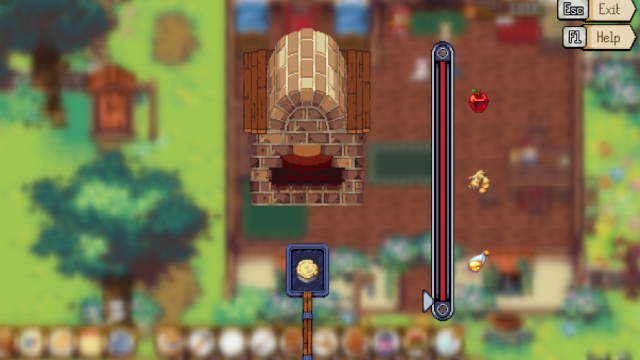
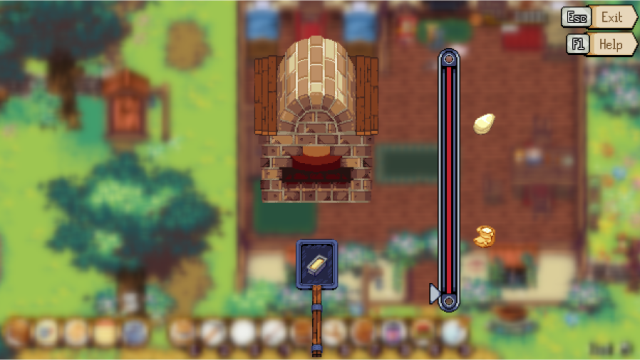
Watch the Baking Meter on the right. As the pie cooks, orange, and then green, bars will appear on the meter. Aim to stop the meter on each of the green bars, but don’t wait too long – they’ll shrink as the pie starts to overcook, and once they disappear your pie will be burned! The more accurate you are here, the better the quality of your pie.
Once you’ve made your three marks on the Meter, use the paddle to take your pie out of the oven and see its quality and traits.
Stews
Inventory Selection
Select one of each item shown in the shopping list on the left of the screen. Your selection will be ticked off the list and added to the food tray. It can be removed by clicking it again.
Higher quality ingredients (those with the most stars) will improve the quality of your stew, but they are more delicate and therefore more difficult to cook to perfection. Choose wisely!
Once you’re happy with the selection in the tray, click the stew pot button at its base to start cooking.
Cooking and Chopping
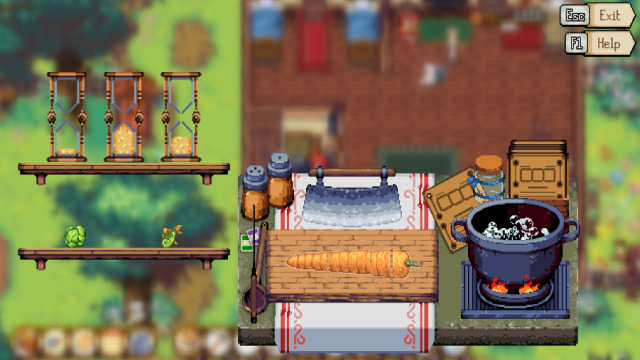
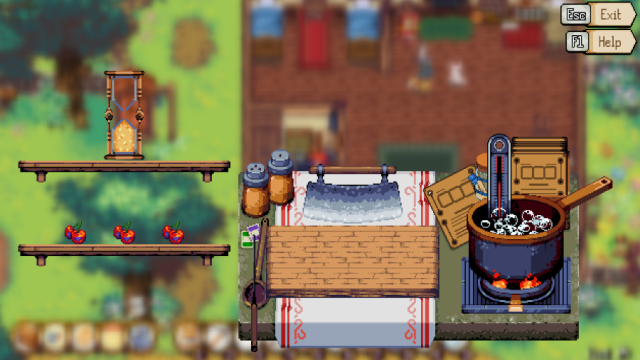
Some ingredients take longer to cook than others, so each one has its own timer. Choose the ingredient with the most sand in its timer first, and it will move to the chopping board.
The best knife for the job will appear. Use it to chop the ingredient - finding the right rhythm can help you chop more efficiently. Once you’ve sliced sufficiently the Chopping Board will tip up and allow you to scrape the ingredient into the pot, and the ingredient’s timer will flip over and start running.
Keep an eye on the thermometer once you have ingredients in the pot. Nobody likes burned or cold soup (apart from Gazpacho enthusiasts!), so use the lever on the burner to keep the pot simmering and keep the quality up.
Choose the ingredient with the next-longest cooking time and chop it. You can choose when to scrape it into the pot, and you can also swap between chopping and adjusting the temperature.
Aim to get all three timers to run out at the same time, with all three ingredients simmering in the pot.
Jams
Inventory Selection
Select one of each item shown in the shopping list on the left of the screen. Your selection will be ticked off the list and added to the food tray. It can be removed by clicking it again.
Higher quality ingredients (those with the most stars) will improve the quality of your jam, but they are more delicate and therefore more difficult to cook to perfection. Choose wisely!
Once you’re happy with the selection in the tray, click the jam pot button at its base to start cooking.
Cooking and Chopping
Aim to keep the pot at simmering point all the way through the cooking time.
The ingredients are on a shelf on the left of the screen. Select and click one to move it to the Chopping Board. The order in which you select them doesn’t matter.
The best knife for the job will appear. Use it to chop the ingredient - finding the right rhythm can help you chop more efficiently. Once you’ve sliced sufficiently the Chopping Board will tip up and allow you to scrape the ingredient into the pot, starting the timer.
The pot’s temperature will drop each time an ingredient is added. Use the lever to adjust the heat and keep it in the simmering zone in the middle of the thermometer – if it stays in the cold blue area or the red boiling area for too long then your jam-making attempt will fail!
Keep an eye on the temperature while chopping the other ingredients. You can switch between chopping and using the temperature lever at any time. Make sure that you add all three ingredients before the timer runs out.
Puddings
Inventory Selection
Select one of each item shown in the shopping list on the left of the screen. Your selection will be ticked off the list and added to the food tray. It can be removed by clicking it again.
Higher quality ingredients (those with the most stars) will improve the quality of your pudding, but they are more delicate and therefore more difficult to cook to perfection. Choose wisely!
Once you’re happy with the selection in the tray, click the pudding bowl button at its base to start cooking.
Chopping
The ingredients are on a shelf on the left of the screen. Select and click one to move it to the Chopping Board. The order in which you select them doesn’t matter.
The best knife for the job will appear. Use it to chop the ingredient - finding the right rhythm can help you chop more efficiently. Once you’ve sliced sufficiently, the Chopping Board will tip up and allow you to scrape the ingredient into the dish.
Repeat these steps with the other two ingredients.
Baking
Use the paddle to slide your pudding into the oven to begin baking it.
Watch the Baking Meter on the right. As the pudding cooks, orange, and then green, bars will appear on the meter. Aim to stop the meter on each of the green bars, but don’t wait too long – they’ll shrink as the pudding starts to overcook, and once they disappear your pudding will be burned! The more accurate you are here, the better the quality of the pudding.
Once you’ve made your three marks on the Meter, use the paddle to take your pudding out of the oven and see its quality and traits.
Bread
Inventory Selection
Select one of each item shown in the shopping list on the left of the screen. Your selection will be ticked off the list and added to the food tray. It can be removed by clicking it again.
Higher quality ingredients (those with the most stars) will improve the quality of your bread, but they are more delicate and therefore more difficult to cook to perfection. Choose wisely!
Some ingredients like eggs and flour don’t have quality variations, so just chuck ‘em in.
Once you’re happy with the selection in the tray, click the loaf button at its base to start baking.
At this point, the eggs and flour will magically combine to make dough.
Chopping
The ingredients are on a shelf on the left of the screen. Select and click one to move it to the Chopping Board. The order in which you select them doesn’t matter.
The best knife for the job will appear. Use it to chop the ingredient - finding the right rhythm can help you chop more efficiently. Once you’ve sliced sufficiently, the Chopping Board will tip up and allow you to scrape the ingredient onto the dough to make topping.
Repeat these steps with the other two ingredients.
Baking
Use the paddle to slide your bread into the oven to begin baking it.
Watch the Baking Meter on the right. As the bread cooks, orange, and then green, bars will appear on the meter. Aim to stop the meter on each of the green bars, but don’t wait too long – they’ll shrink as the bread starts to overcook, and once they disappear your bread will be burned! The more accurate you are here, the better the quality of the bread.
Once you’ve made your three marks on the Meter, use the paddle to take your bread out of the oven and see its quality and traits.
Sandwiches
Inventory Selection
Select one of each item shown in the shopping list on the left of the screen. Your selection will be ticked off the list and added to the food tray. It can be removed by clicking it again.
Higher quality ingredients (those with the most stars) will improve the quality of your bread, but they are more delicate and therefore more difficult to cook to perfection. Choose wisely!
Some ingredients like eggs and flour don’t have quality variations, so just chuck ‘em in.
Once you’re happy with the selection in the tray, click the loaf button at its base to start baking.
At this point, the eggs and flour will magically combine to make dough.
Baking – Stage 1
Use the paddle to slide your dough into the oven to begin baking it.
Watch the Baking Meter on the right. As the bread cooks, orange, and then green, bars will appear on the meter. Aim to stop the meter on each of the green bars, but don’t wait too long – they’ll shrink as the bread starts to overcook, and once they disappear your bread will be burned! The more accurate you are here, the better the quality of the bread.
Once you’ve made your three marks on the Meter, use the paddle to take your bread out of the oven
Chopping
The ingredients are on a shelf on the left of the screen. Select and click one to move it to the Chopping Board. The order in which you select them doesn’t matter.
The best knife for the job will appear. Use it to chop the ingredient - finding the right rhythm can help you chop more efficiently. Once you’ve sliced sufficiently, the Chopping Board will tip up and allow you to scrape the ingredient onto the bun to fill the sandwich.
Repeat these steps with the other two ingredients.
Baking – Stage 2
Use the paddle to slide your sandwich into the oven to begin baking it.
Watch the Baking Meter on the right. As the sandwich cooks, orange, and then green, bars will appear on the meter. Aim to stop the meter on each of the green bars, but don’t wait too long – they’ll shrink as the sandwich starts to overcook, and once they disappear your sandwich will be burned! The more accurate you are here, the better the quality of the sandwich.
Once you’ve made your three marks on the Meter, use the paddle to take your sandwich out of the oven and see its quality and traits.
